You may think that creating moss-inspired wall décor is a complex and time-consuming process, but I assure you, it’s easier than you might imagine. In fact, with the right materials and a little bit of patience, anyone can create their own stunning moss-inspired wall décor.
So why should you consider adding this unique and natural touch to your home or office? Well, not only does moss-inspired wall décor provide a visually striking focal point, but it also offers numerous health benefits. Moss is known for its air-purifying properties and ability to reduce noise levels, making it an excellent choice for enhancing any space.
In this article, I will guide you through the step-by-step process of How To Do Moss Wall Art. From choosing the perfect location to caring for your creation, I’ll share all my tips and tricks to ensure your project is a success.
So let’s get started on this exciting journey into the world of moss-inspired wall décor with Nousdecor!
Key Takeaways of How To Do Moss Wall Art
- Moss-made wall art is visually striking and easy to create.
- Moss has air-purifying properties and absorbs pollutants while releasing oxygen.
- Choosing the right location with natural light and humidity levels is important.
- Proper moss preparation and wall surface preparation are necessary for installation.

Choosing the Perfect Location for Your Preserved Moss Wall Art
Now that you’ve gathered your beautiful moss-inspired wall décor, it’s time to find the ideal spot in your home where it can truly shine and bring a touch of nature into your living space.
Enhancing indoor spaces with these Home Decor Items not only adds an aesthetic appeal but also offers numerous benefits for air quality. Unlike natural wood wall decor, being living plants with all the natural elements, moss is known to absorb pollutants and release oxygen, creating a healthier environment for you and your family.
Look for areas in your home that could benefit from some affiliate links of greenery, such as the living room or bedroom. Consider natural light availability and humidity levels when choosing the location.
Once you’ve selected the perfect spot for your twigs, it’s time to move on to gathering the necessary materials needed for installation.
Gathering the Necessary Materials for Your Living Moss Wall Decor
First, gather all the essential supplies to bring your moss masterpiece to life. Start by choosing the right type of moss for your wall art. There are various options available, such as sheet moss, cushion moss, or reindeer moss.
Consider the specific look you want to achieve and the environment in which the Wall Art Decor will be displayed. Once you have selected your desired moss, it’s important to prepare it for installation. Remove any debris or dead leaves from the moss and gently rinse it with water if needed.
Allow the moss to dry completely before proceeding with installation. With these materials gathered and prepared, you can now move on to preparing your wall for moss installation by ensuring its cleanliness and suitability for attaching the moss seamlessly.
Fore some other wall art besides moss-made, check out our articles on syroco wall art collection and stylish car silhouette wall decor now!
Now that we have our materials ready, let’s move on to preparing our wall for smooth Moss Art installation…

Preparing Your Living Wall for Moss Installation
To ensure optimal results, it is imperative to meticulously prepare the surface where you plan to display your exquisite moss masterpiece. Preparing the wall surface involves several crucial steps that will help create a suitable environment for moss installation.
First, thoroughly clean the wall by removing any dirt, dust, or debris using a mild detergent solution and a sponge or soft cloth. Next, inspect the wall for any cracks or holes and patch them up with spackling compound or putty.
Once the wall is clean and repaired, prime it using a high-quality primer specifically designed for porous surfaces like moss-made walls. This will create a smooth and even base for better adhesive attachment.
With the wall fully prepped and primed even for hanging art on slanted walls, you are now ready to move on to creating your unique moss design seamlessly.
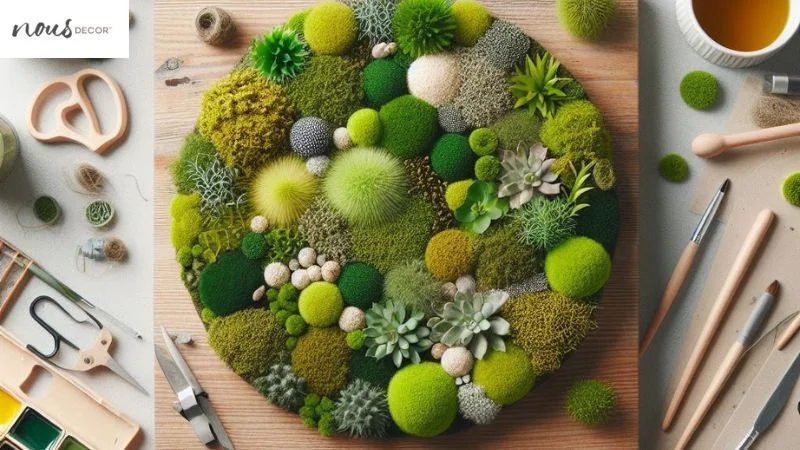
Making DIY Moss Wall Art Design
Get ready to unleash your creativity and embark on a mossy adventure that will transform your DIY wall into a lush, vibrant masterpiece like no other. When it comes to creating your moss design, choosing the right varieties of moss is crucial.
Consider using different textures and shades to add depth and visual interest to your artwork. Next, think about designing a unique pattern that suits your style and complements the space where the art will be displayed.
You can create geometric shapes, nature-inspired motifs, or even personalized initials using the versatile medium of moss. Experiment with different arrangements until you find the perfect combination that speaks to you.
So now that you have designed your stunning green wall décor, the rest is just hot gluing your moss art into the wall using glue sticks, thus let’s move on to caring for it in order to ensure its longevity and beauty.
For more DIY inspirations, check out our other articles on DIY name crossword wall art generator and printable scripture wall decor now!
Caring for Your Framed Moss Art
Ensure that your mossy art piece remains lush and vibrant after gluing by providing it with the proper care and attention it deserves. Moss-made wall art maintenance is crucial to preserving its beauty and longevity.
One important aspect of caring for your moss panel is ensuring that it receives the right amount of moisture. Mist the moss lightly every few days, making sure not to oversaturate it. Additionally, keep your moss-inspired wall décor away from direct sunlight as prolonged exposure can cause the moss to dry out and lose its color.
To maintain its vibrant green hue, gently brush off any dust or debris from the front to the back of the frame using a soft paintbrush or feather duster. Finally, if you notice any patches of dead or brown moss, carefully remove them to prevent them from spreading and impacting the overall appearance of your artwork.
With these simple steps, you can ensure that your moss-inspired wall décor remains a stunning focal point in any space for years to come.
By the way, if you’re interested in some other unique wall art, check out our articles on rice paper shadow box art and doily wall art ideas now!
Frequently Asked Questions
Conclusion
In conclusion, the process of How To Do Moss Wall Art is a simple and rewarding process that allows you to bring nature’s beauty into your home or office. Moss wall art not only provides a visually striking focal point but also offers health benefits by purifying the air and reducing noise levels.
By following the step-by-step guide in this article, you can choose the perfect location, gather the necessary materials, prepare your wall surface, create a unique moss design, and care for your moss-inspired wall décor to ensure its longevity.
With a little creativity and attention to detail, you can enjoy the natural elegance of moss in your living space. Begin your mossy adventure today and embrace the beauty of nature on your walls!
Interested in other natural-inspired art? Check out our articles on Driftwood Wall Art and Floral Wall Art instead!