The installation process of blinds can be a daunting task, but with the right preparation and tools it’s easier than you think. In fact, it’s estimated that over 52% of homeowners have successfully installed their own blinds!
If you’re looking to take on this DIY project for yourself, we at Nousdecor have got all the information you need to get started. Here are the steps for How To Window Blinds Installation in your home.
From choosing the right style and gathering the necessary tools to attaching the head rail and valance, we’ll walk you through the step-by-step window treatment installation process so you can enjoy your new blinds in no time.
Key Takeaways of How To Window Blinds Installation
- The installation process of blinds is a DIY project that over 52% of homeowners successfully complete themselves.
- Consider factors such as style, light control, and privacy when choosing blinds.
- Different types of blinds offer various lightweight window covering options, including roller, Venetian, Roman, and vertical blinds.
- Gather necessary tools and hardware, such as a power drill, tape measure, brackets, and screws, for the installation process.
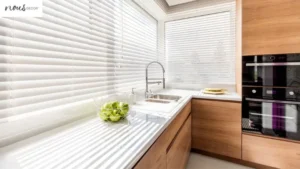
Choose the Right Window Frames and Faux Wood Blinds
Picking the right window treatments blinds for your home can be a fun and exciting process! Consider the style of the room, the amount of light you want to let in, and how much privacy you need. If you need a lot of natural light during the day but require complete privacy at night it can be tricky to find just one option.
There are different types of blinds such as roller (see measuring tips for roller shades), Venetian (see step-by-step Venetian blinds installation tutorial), Roman (see What Is Roman Shade), and vertical styles which all offer something different.
Think about what will work best for your space – do you want block out or sheer fabrics? What colour or material will complement your decor?
Getting this right is vital for achieving a stylish finish. Once you’ve made your decision, it’s time to gather the necessary tools for installation.

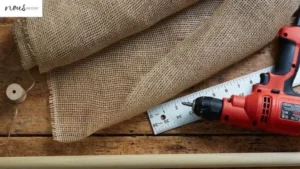
Gather the Necessary Tools for Blinds and Shades Installation
Gathering the essential window treatment accessories for the job can take forever – it’s like a never-ending scavenger hunt! Here is what you should have on-hand to get started:
- A power drill and drill bit set
- A tape measure
- An adjustable wrench and/or screwdriver
Having the right tools ready can make a big difference in how quickly and easily your blind installation goes. You’ll also need brackets, lag screws, and other hardware that will come with your blinds package—so make sure everything is accounted for before getting started on your project!
With all of your equipment in order, you’re now ready to set up the brackets.
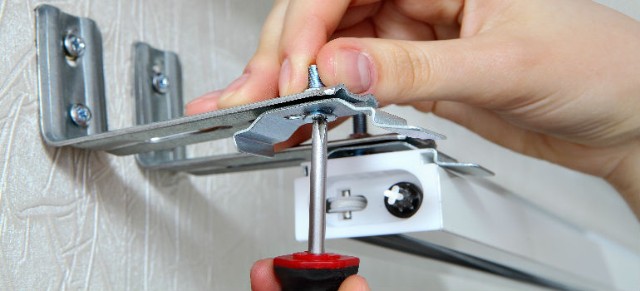
Install the Mounting Brackets
The installation process of the brackets is essential for completing the project quickly and efficiently. We need to measure accurately to ensure a level fit, so that when we hang our popular treatment options blinds they look professional and last a long time.
To mount the brackets, choose your desired location on the window frame or wall and mark it with a pencil. Make sure you keep them an equal distance from each other by using a measuring tape. Next, grab a screwdriver or a hammer, depending on the fasteners you’ve chosen. Align the holes on the brackets with the marks you made earlier.
If you’re using screws, insert them through the holes and use the screwdriver to tighten them. For nails, position the brackets and tap the nails gently into the marked spots using the hammer. Before fully securing the brackets, double-check their alignment and adjust if necessary.
It’s important to ensure they are straight and level to properly support whatever you’ll be hanging on them.
Once the brackets are securely in place, give them a gentle tug to make sure they’re firmly attached to the surface. If they feel loose, tighten the screws or nails a bit further, being careful not to over-tighten.
Now you’re ready to hang your desired object, whether it’s a curtain rod, a shelf, or any other item that can be supported by the brackets. Just make sure you follow the specific instructions for attaching your object to the brackets to ensure stability and safety.
With the brackets in place, now’s the time to attach the head rail and valance.
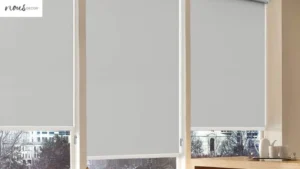
Attach the Head Rail and Valance For Outside Mount & Inside Mount
Now it’s time to attach the must-have decor items such as Bathroom Window Treatments Ideas which are head rail and valance, so grab your tools and get ready – it’ll be a breeze!
To hang up the blinds, follow these steps:
- Measure the desired length of the blinds and cut them to size if necessary.
- Attach the included brackets to the top of the blinds. Ensure that the brackets are evenly spaced and level. Use screws or any other provided hardware to secure the brackets tightly.
- Hold one end of the blinds and hook it onto the corresponding bracket. Carefully align the other end and secure it onto the second bracket. Double-check that the blinds are level and straight.
- Test the functionality of the blinds by pulling the cord or using any other operating mechanism. Make sure the blinds open and close smoothly without any obstructions or misalignment.
- Adjust the blinds’ angle to control the amount of light entering the room. Tilt the blinds’ slats upward or downward to achieve the desired amount of privacy and sunlight.
- Optionally, attach a safety cord or cleat to keep the blind cords out of reach of children or pets. Securely tie the cord around the cleat, making it inaccessible to potential hazards.
- Take a step back and admire your newly installed blinds. Adjust any minor details or fix any misalignment if necessary.
Note: The process and specific steps may vary depending on the type and style of blinds you are hanging. Please refer to the manufacturer’s instructions for detailed guidance. And if your blinds are plantation ones, check out our article on step-by-step plantation shutter installation tutorial now!
Hang the Vertical Blinds and Mount Blinds
Grab your tools and get ready to hang those blinds – it’ll be a piece of cake! With the head rail and valance already attached, you’re almost done.
Start by carefully lifting the blinds into place and inserting the top slats into the mounting brackets. Make sure they’re secure before moving on to the next step.
Once all the slats are in place, use a leveler to ensure everything is evenly aligned. If necessary, make adjustments until everything looks perfect.
Finally, attach any cords or chains needed for manual operation of your new blinds – then you can sit back and enjoy your hard work!
- Before beginning the installation process, gather all the necessary tools and materials. This step for blinds may include a screwdriver, drill, brackets, screws, leveler, and measuring tape.
- Measure the width of the window frame to determine the correct size of your blinds. If necessary, trim the blinds to your desired width using a small hacksaw or a pair of scissors.
- Set up the brackets according to the manufacturer’s instructions. Typically, brackets are placed at each end of the window frame and one or two additional brackets are evenly spaced in between.
- Carefully lift the blinds and insert the top slats into the brackets. Make sure they fit securely and are not loose. If the brackets have screws, use a screwdriver or drill to secure them in place tightly.
- Use a leveler to check if the blinds are straight and even. Adjust the brackets or slats as needed to ensure proper alignment. This step is crucial for the blinds to operate smoothly.
- Once the blinds are level, attach any cords or chains required for manual operation. These may include lift cords, tilt controls, or cord cleats. Carefully follow the instructions provided with your blinds to correctly attach these elements.
- Test the blinds by pulling the cords or chains to ensure smooth operation. Make any necessary adjustments to the brackets or slats if the blinds do not function properly.
- After verifying that everything is working correctly, clean the blinds with a damp cloth or blind cleaner to remove any dust or debris that accumulated during installation.
- Step back and admire your newly installed blinds. Adjust the slats to your desired angle and enjoy the privacy, light control, and aesthetic enhancement they bring to your space.

Note: It’s important to always prioritize safety during blind installation. Follow the manufacturer’s safety guidelines and ensure that cords or chains are properly secured and out of reach of children or pets to prevent accidents.
Frequently Asked Questions
Conclusion
We’ve just finished up guiding you How To Window Blinds Installation! Now all that’s left is to enjoy the new look and feel of your room. With a few simple steps, you can dramatically change the atmosphere of any space.
Not only do blinds provide much-needed shade or privacy, they also add a touch of style to any room. Our job here is done, so let’s take a step back and admire our work – alliteration never looked so good!