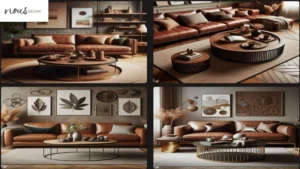
Are you looking for a fun and unique way to bring entertainment into your living room? Look no further than a DIY game machine table. This innovative piece of furniture not only serves as a stylish and functional coffee table but also provides endless entertainment with its built-in games.
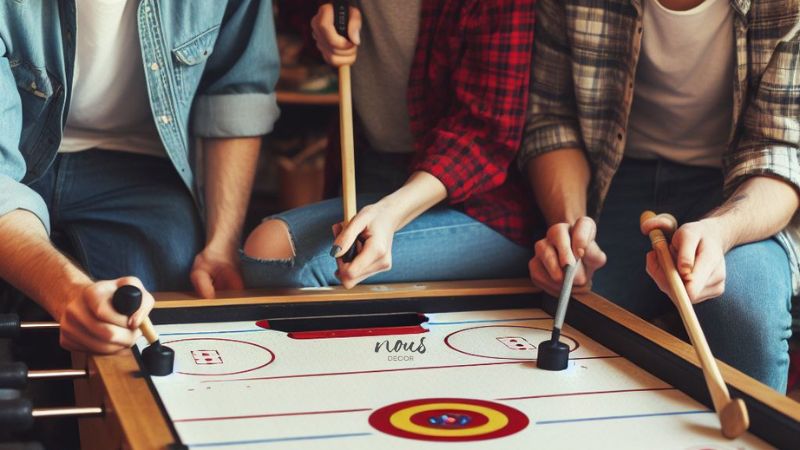
Creating your own DIY Arcade Coffee Table comes with a multitude of benefits. You have the freedom to customize the design to fit your personal style and preferences. Whether you want to add a coin door for a nostalgic touch or incorporate vinyl artwork for a retro aesthetic, the options are endless. Additionally, having a DIY game arcade table allows you to enjoy 2-player games with friends and family right in the comfort of your living room.
To build your own DIY game machine table, you will need materials such as an LCD monitor, USB controllers, and a paper template for the sized holes. Make sure to use a jigsaw and follow the paper template so you can go slow and cut the side panels and remove the protective shader to install the pre-installed emulation software. Whether it’s for home use or to add a fun element to hotel lounges or banking, a DIY game machine table is sure to elevate your entertainment experience. So roll up your sleeves, take your time, and get ready with Nousdecor to enjoy all your favorite arcade-era games in a whole new way.
Takeaways
- Constructing a DIY Arcade Tea Table involves meticulously selecting the right materials and sourcing essential electronic components while envisioning and designing an interactive gaming interface and captivating aesthetic features.
- The process necessitates skillfully connecting these components through precise electronics integration and expert carpentry techniques.
- The integration of chosen wood types like hardwood or MDF with vital electronics, such as a monitor, Raspberry Pi, and controls, forms the foundation for a functional game machine table.
- Designing an engaging joystick layout and incorporating appealing LED lighting further enhances the user experience.
- Mastering the wiring intricacies and meticulously constructing the table structure is paramount in assembling a seamless DIY game machine table.
- This intricate integration of materials, designs, and assembly results in a multifunctional and entertaining piece that amalgamates gaming pleasure with furniture functionality.
Materials and Tools To Get Started
To get started on your coffee table plans, you will need a variety of materials and tools to bring your project to life.
- Firstly, you will need wood for the base and top of the table, as well as plexiglass to cover the screen.
- Additionally, you will need various electronic components including a monitor, speakers, and buttons for the control panel.
- For the game machine build, you will also need a Raspberry Pi or a similar microcomputer to run the gaming software.
- When it comes to tools, you will require a saw, drill, screwdriver, and sandpaper for the woodworking aspect of the project.
- For the electronic components, you may need a soldering iron, wire cutters, and a multimeter to ensure everything is properly connected and functioning.
Whether you’re building a 2 player or 4 player arcade cabinet, or opting for a bartop or classic arcade cocktail design, having the right materials and tools is essential. You may also want to invest in gaming cabinet plans to guide you through the construction process. From securing cables to installing classic machine games such as Centipede, the right materials and tools are crucial for a successful arcade conversion project.
Step-by-Step Instructions For Building DIY Arcade Coffee Table
Building a coffee table arcade can be a fun and challenging project for DIY arcade machine enthusiasts.
- To begin, you’ll need to construct the frame of the table using sturdy wood and secure it with support beams.
- Next, install the arcade buttons and controls, ensuring they are properly connected and functional.
- Then, carefully add the screen and glass, making sure everything fits securely.
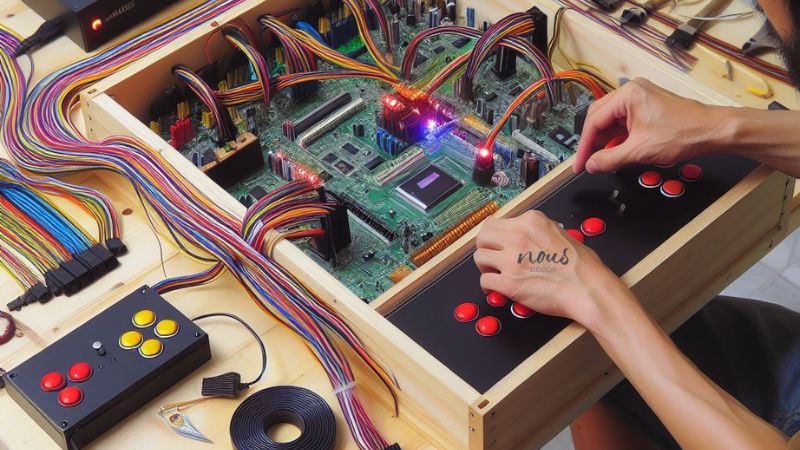
- The wiring and programming of the system can be a bit complex, but with the right resources and instructions, it can be accomplished.
- After that, sand and stain the wood to give it a polished finish.
- Adding custom graphics or artwork to the table can personalize it and make it unique.
- Additionally, installing LED lights or other decorative elements can enhance the overall look and feel of the game machine table.
Once complete, you’ll have a stylish and functional piece of furniture that doubles as a cocktail table arcade, perfect for playing classic games like Golden Tee or driving games like CRT. And with the option of adding hairpin legs, it can easily be converted into a DIY coffee table.
Constructing the Frame
- When constructing the frame for our modern entertainment center, we started by carefully measuring and cutting the edge pieces to ensure a precise fit.
- We then seamlessly integrated an HDMI cable into the design to connect our various electronic devices, like the Neo Geo gaming console and a sleek Marquee for a touch of retro charm.
- You should try to utilize an Ikea Boksel as the base for our industrial coffee table, adding not only a functional element but also a trendy focal point for the room.
- Inside the frame, make sure to leave ample space for storage shelves and organized compartments, keeping the overall aesthetic clean and uncluttered.
The combination of the sleek, modern frame design with the vintage-inspired elements creates a unique and visually striking piece that fits perfectly with our interior decor.
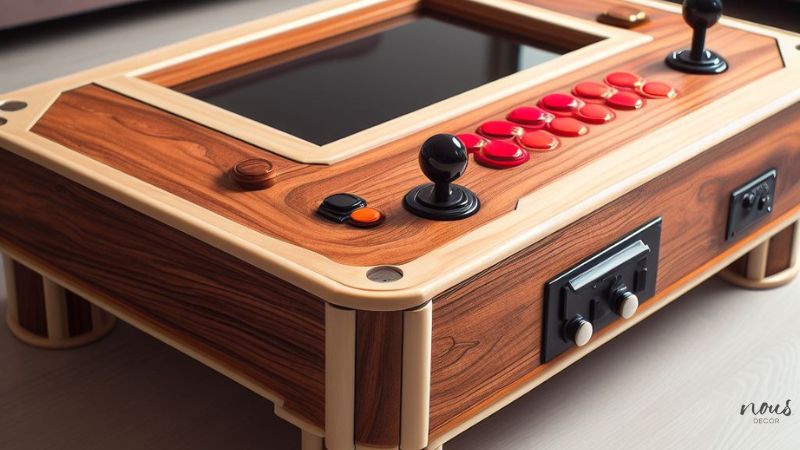
Installing Arcade Buttons & Controls
If you’re looking to add a fun and retro touch to your outdoor coffee table, consider installing buttons and controls. Whether you want to recreate the classic Pac Man experience or create your own custom game with your chic tabletop styling ideas, adding these components can bring a new level of entertainment to your space.
- To start, you’ll need to gather the necessary parts, including the buttons, a joystick, and a power source. The power source can be connected using a power cable and a power strip to ensure everything is properly powered.
- Once you have all the components, it’s time to get to work. If you have a specific table in mind, such as the Ramvik coffee table from IKEA, you can start by marking the appropriate spots for the buttons and controls.
- Additionally, if you want to go for a classic game machine feel, consider using red buttons to match the vintage aesthetic.
Once everything is installed, you’ll be ready to enjoy countless hours of gaming fun right at your own coffee table.
Adding Screens & Glass Tops
Adding screens and glass tops to your game machine counter can be a great step to enhance the look and functionality of your gaming space. By installing screens and glass at the same time, you can create a sleek and modern aesthetic that will impress your friends and customers.
- To achieve this look, you will need to use a slim and thin glass that can be custom cut to fit your specific game machine counter. You can use a table saw or have it professionally cut to ensure a perfect fit.
- Adding side art to the screens can also help tie the whole look together and give your game machine a professional and polished appearance.
- Additionally, you can spray paint the edges of the glass to match the theme of your game machine, whether it’s Street Fighter or any other style.
Overall, adding things like screens and glass is a simple but effective way to elevate the look of your gaming space and bring a whole new level of sophistication to your setup.
Wiring & Programming The System
Speaking of wiring and programming the system when you want to build an arcade counter, there are several key components to consider for your DIY industrial-style table projects.
- First, you’ll need to ensure the top coffee table is equipped with the necessary wiring and connections to power the system. You’ll also need to program the system to run games such as Tron smoothly and efficiently. A USB hub may be needed to connect various controllers and devices to the system, ensuring seamless gameplay.
- If the counter is a vertical design or wall mount, special consideration will need to be taken when wiring and programming the system to ensure it fits and functions properly.
- If you purchased a pre-made game machine counter, such as the West Elm model, you’ll need to carefully follow the manufacturer’s instructions for wiring and programming the whole thing to ensure it works as intended.
By carefully considering and addressing these components, you can ensure your game machine counter is wired and programmed to provide the ultimate gaming experience.
Sanding & Staining the Wood
When building a cocktail arcade or working on a unique fish tank table creation, sanding and staining the wood for the counter is an important step in achieving a professional and polished finish. If you’re using a wood coffee table or building a wooden coffee table from scratch, the process will be the same.
- Start by sanding the table top with fine-grit sandpaper to ensure a smooth and even surface.
- Then, choose a stain that complements the rest of your retro arcade build, whether it’s a classic wood finish or a bold pop of color.
- If you’re integrating a retropie system, make sure to drill holes for buttons and a joystick using the appropriate drill bit.
- Once the staining is complete and the wood is dry, you can move on to assembling the rest of your cocktail game machine.
With the right sanding and staining techniques, you’ll have a beautifully finished retro game machine that looks professional and polished.
Adding Custom Graphics Or Artwork to The Table
One of the great features of the game machine table is the ability to add custom graphics or artwork to make it your own. Using a Raspberry Pi 3B and an emulator, you can easily personalize the tabletop arcade machine with your favorite images or designs. The structure of the table is made of plywood, giving you a smooth canvas to work with.
Whether you want to showcase classic NES game art or create a design that represents your favorite player 1 character, everything you need is at your fingertips. And with the touchscreen coffee table, you have full control over how your graphics are displayed. Adding T-molding to the sides of the cabinet not only gives it a professional finish but allows for further customization with colors that suit your style.
You can find inspiration and helpful tips for customizing your game machine table using a Raspberry Pi on the internet at Imgur. The only limit to personalization is your imagination.
Installing LED Lights & Other Decorative Elements
When it comes to enhancing the aesthetics of your game machine table, installing LED lights and other decorative elements can take your gaming experience to a whole new level. With the addition of LED lights, you can create a mesmerizing ambiance that complements the sleek design of the table, while also providing a visually stunning experience for you and your guests.
The tempered glass surface provides a perfect canvas for the LED lights to shine through, adding a touch of modern elegance to the table. By integrating a controller board and two-player controller kit inside the cabinet, you can easily customize the lighting effects to match the mood of your gaming sessions.
As you dive into your favorite games, you’ll discover the magic of the LED lights as they illuminate the table, creating an immersive and unforgettable gaming experience. Whether you’re playing classic arcade games or modern titles, the addition of LED lights and other decorative elements will elevate the overall aesthetic and appeal of your arcade tea table.
Testing and Troubleshooting
Testing and troubleshooting the arcade table was an exciting and challenging process. The table is designed to bring arcade gaming into a modern living space, providing a perfect platform for retro gaming enthusiasts.
- During testing, we aimed to ensure that every aspect of the table functioned perfectly, from the ability to flip the table for easy access to the internal components, to the responsiveness of the joysticks and buttons.
- We also wanted to ensure that users could explore by touch when gaming, without any lag or delay. Troubleshooting involved identifying and resolving any potential issues, such as loose connections or faulty buttons.
- We also drilled a hole in the bottom of the table, which doubled as a spot perfect for banking.
Overall, the testing and troubleshooting process was essential in perfecting the arcade tea table, ensuring that it delivers an authentic and seamless gaming experience.
Frequently Asked Questions
Conclusion
In conclusion, the DIY game machine table offers a multitude of benefits, from providing a unique and entertaining addition to your living room to the satisfaction of building it yourself. This project allows for the integration of a cutout for a Raspberry Pi 3, an LCD screen, and even a cocktail mode for playing games with friends.
With the ability to display trending memes, entertaining gifs, and viral videos, this coffee table is sure to be a hit in any household. Utilizing common materials such as Ikea furniture and building around the LCD screen size, constructing this table is both convenient and cost-effective. The multipoint software and speed test makes it easy to accommodate touch device users, and the community focuses around the projects that come with it.
Whether you’re a gaming enthusiast or simply enjoy DIY projects, the DIY game machine table is a perfect opportunity to try building your own entertainment center for hours of fun with family and friends. So grab your game controller, drill a hole in the short sides of the tabletop, and get ready to bank on the limitless entertainment possibilities this table has to offer.